
| PedalDoctor FX Featured Repair |
| |
| |
| |
| |
| |
| |
| |
| |
| |
| Home | Pedals | Custom | Repair | Reviews | Tips | For Sale | Order | Links | Meet Doc Contact: PedalDoctor FX Ph (615) 794-5875 Copyright 2000-2010 PedalDoctor FX. All rights reserved. |
| Breathing life into a dead Diaz "Tremodillo" |


| Step One: Getting to the PC Board... |
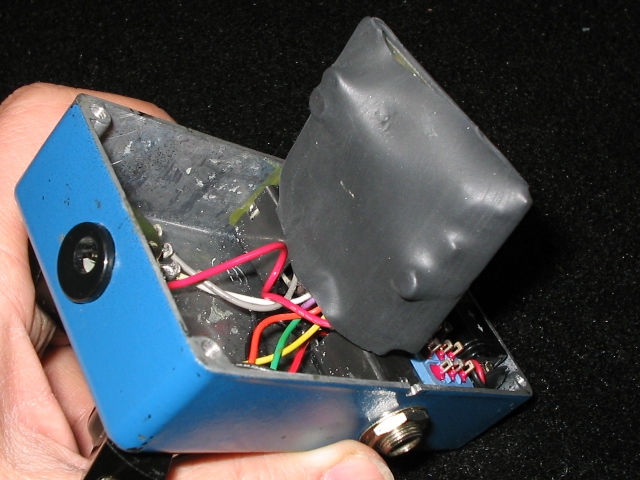
| A: I started out with the task of removing the board and controls (which were gooped down as well) from the enclosure, being careful not to pull to hard and cause more damage. This one had some funky foam glued down to the board, just to make it a bit tougher!! |
| A: |
| B: |
| B: Once the board and components were removed, I began the daunting task of removing all of the adhesive. If you try this, make sure to take your time! I use a very narrow needle nose pliers and take tiny bites. If there is ANY resistance, don't pull, just try another spot; you may be wretching a part or wire. |
| C: After an hour or so, a very nasty looking circuit board emerges. During the process, I was able to track down what might be the ailment and make note of it. It's a good practice to keep a notepad handy during the proceedure to write notes and draw pictures to help reassemble the pedal. |
| C: |

| D: |
| D: Here's the problem: the grounded side of C5 was broken right where it entered the capacitor.(1) Most likely as a result of the adhesive shrinking over time. Also, the ground side of C2 had a cold solder joint (2) that was probably aggrivated by the same condition. |

| E: After getting the PC board out of the enclosure, stripping the hardened adhesive, and making notes of the wiring layout, I disconnected the leads and carefully cleaned the board with a diluted solvent and toothbrush. This is also a good opportunity to make an actual schematic of the effect for your collection. |
| E: |
| F: |
| F: Finally a clean, serviceable circuit board emerges. Notice that C5 has already been replaced. The next step is testing the unit before reassembly and when I replace the board it will be shrink wrapped to prevent shorts or damage to the circuit while making it easier for any future servicing. |
| Step Two: Diagnosis and Repair... |

| I'm often found that musicians will discard a pedal that no longer works because of the cost of repairs. Please call me if that favorite old stompbox finally (or suddenly) quits working. You may be surprised at how little it costs to revive it! This months fun began when I received this little fella in the mail. It's a great pedal, worthy of the time spent under the "solder scalpel" to get it going again. I'll keep you posted with it's progress... |

| Step Three: Putting it all back together... |


| ...and finally, the mods. |
| F: |
| F: Well, I finally got the Tremodillo back in shape. It turns out that there were more problems than just some fractured solder joints and leads. Three of the four NTE123AP transistors were dead, apparently from using a poor quality power supply. (see the notch filed out on the input side in photo G) |
| G: Before replacing the back, I protected the circuit by sealing off the board with shrink tubing. This also makes it easier to get into for later servicing or mods. (this photo was taken after the mods were done) Make sure to allow yourself enough length in the leads to route them out one end of the shrink tube. I also do this to many older MXR pedals that have deteriorated foam around the board. |
| "Pulse" LED Added |
| 9v Power port |
| LED flashes with trem speed |
| G: |
| Not all repairs are worthy of a full article but this is a situation that I'm running into more and more. With the continuing growth of "boutique" pedal designers/builders out there, there is also a growing number of pirates that will steal a design and put their name on it without thinking twice about it. As a result it has sadly become nescessary to protect your work. Some engineers will simply remove markings on the components while others will enclose the entire circuit with some type of adhesive. Often the later will eventually cause circuits to fail making it nearly impossible to find the problem and fix it. The Diaz Tremodillo is one of these cool 'boutique" pedals protected by a hefty armor of goop that if failing, is worthy of the time spent repairing it. It is a "hard" tremolo based on the old Kay tremolo pedal enclosed in a cheesy but cool, blue plastic, art decco treadle enclosure with a slider switch to engage the effect. The only control that the user had on the effect was to speed up the tremolo by "accelerating" the pedal like a volume pedal. Designed by the late Caesar Diaz who was famous for his incredible ability to squeeze absolutely the best tone out of vintage amps, the Tremodillo reflects this rule for cool. With the addition of a "Depth" control and a "Speed" switch that allows the user to toggle detween normal and double the pulse time, Diaz had taken a cheap, simple circuit and made it an interesting, useable Trem. If you an get your hands on one of them, make sure to spend some time noodling with it. It's nothing like the "ebb-and-tide" tube tremolos found on the early tube amps but it is a pretty cool alternative to the standard trem. This project may not be for the fainthearted. The Tremodillo has more than a hard outer shell. It's PC board is ferociously protected by a generous glopping of hardened goop. Hang out with me as I work to get a pulse on this tough little critter again. -"Doc" |
| Caesar Diaz "Texas Tremodillo" |
